
Blog
The 7 Phase QA Checklist - From Strategy to Release
.png)
Published on
March 9, 2026


Stop missing critical QA activities. This QA checklist covers test planning, environment setup, execution, automation, and defect management end to end.
Quality assurance looks nothing like it did five years ago. AI code generation tools are accelerating development velocity. Release cycles have compressed from months to days. Enterprise applications from SAP to Salesforce push frequent updates that break traditional test suites overnight. This QA checklist is built for that reality. It covers everything from test strategy fundamentals to AI native test automation, giving your team a single reference point for shipping software with confidence.
The role of QA has expanded dramatically. Testing teams are no longer just finding bugs. They are verifying AI generated code, ensuring business process integrity across interconnected enterprise systems, and delivering continuous feedback within CI/CD pipelines that deploy multiple times per day.
Without a structured checklist, critical activities get missed. Regression coverage gaps appear. Environment configurations drift. Defects that should have been caught in development reach production. A comprehensive QA checklist eliminates ambiguity, ensures consistency across team members, and creates accountability at every stage of the testing lifecycle.
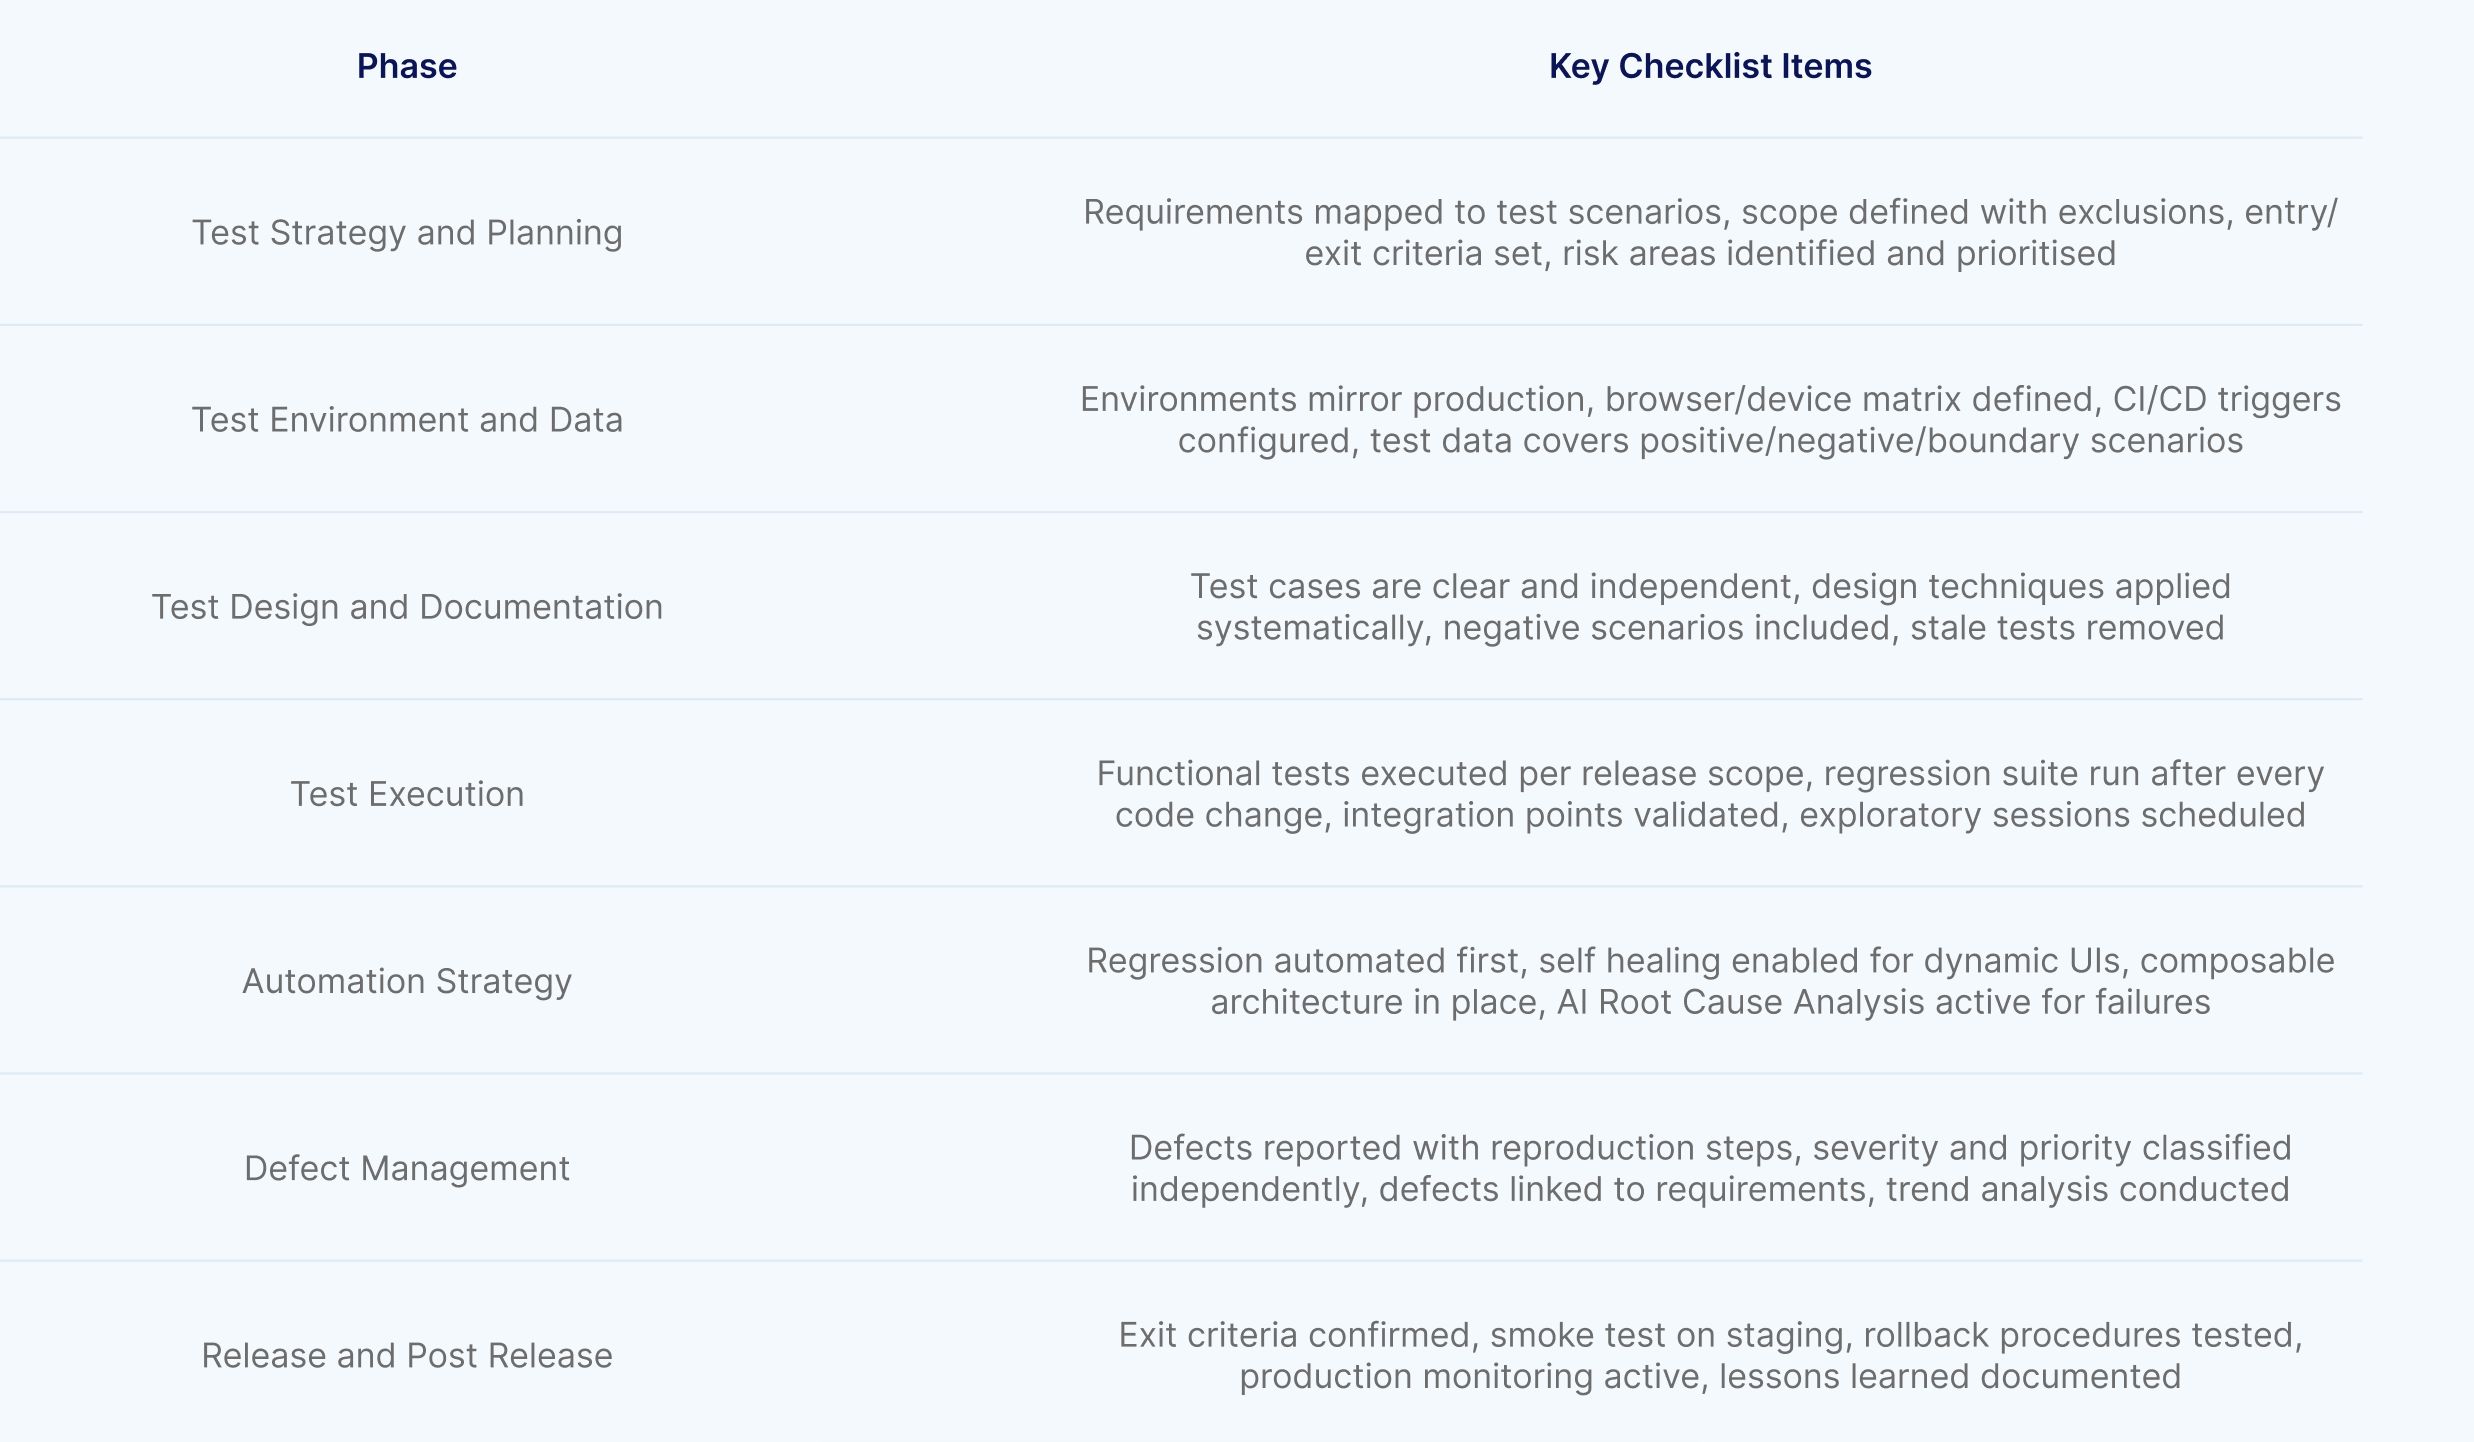
The checklist below is organized by phase, from planning through post release monitoring, so your team can adopt it as a living reference that evolves with your process.
Confirm that all user stories, acceptance criteria, and business requirements are documented and accessible to the testing team. Every requirement should have at least one corresponding test scenario.
Identify testable and non testable requirements early. Flag any requirements that are ambiguous, incomplete, or conflicting, and resolve them with stakeholders before test design begins.
Map requirements to business processes. For enterprise applications, understand the end to end workflows that span multiple modules. A change in an order management module may affect invoicing, inventory, and reporting downstream.
Define the scope of testing explicitly. Document what will be tested, what will not be tested, and the rationale for exclusions. This prevents scope creep and ensures resources are focused on the highest risk areas.
Establish entry and exit criteria for each test phase. Entry criteria define the conditions that must be met before testing begins (stable build, environment ready, test data available). Exit criteria define what constitutes completion (coverage thresholds, defect closure rates, stakeholder sign off).
Select testing types based on risk and application architecture. Functional testing, regression testing, integration testing, end to end testing, and exploratory testing each serve different purposes. Not every release requires every type.
Allocate resources and define the testing timeline. Account for test design, environment setup, test data preparation, execution, defect resolution, and retesting. Underestimating any of these phases is the most common cause of QA bottlenecks.
Identify high risk areas based on complexity, change frequency, business criticality, and historical defect density. A payment processing module with recent code changes is higher risk than a static about page.
Prioritize test coverage based on risk ranking. In compressed release cycles, 100% coverage is rarely achievable. Risk based prioritization ensures the most critical business flows are verified first.
Document known risks and mitigation strategies. If a third party integration cannot be tested in staging, document the risk and define the monitoring plan for production.
Verify that test environments mirror production as closely as possible. Configuration drift between environments is a leading cause of defects that appear only in production. Database versions, API endpoints, third party integrations, and feature flags should all match production settings.
Confirm browser and device coverage requirements. For web applications, define the matrix of supported browsers, operating systems, and screen resolutions. Cloud based testing platforms can execute tests across 2000+ OS, browser, and device combinations without maintaining physical infrastructure.
Validate that CI/CD pipeline integrations are configured and functional. Test execution should be triggerable from Jenkins, Azure DevOps, GitHub Actions, GitLab, CircleCI, or whatever pipeline tool your team uses. Manual test triggering introduces delays and human error.
Prepare test data that covers positive scenarios, negative scenarios, boundary conditions, and edge cases. Test data should be realistic enough to expose real world defects but sanitized to comply with data privacy regulations.
Implement test data generation strategies for complex scenarios. AI powered data generation can create realistic datasets on demand using natural language prompts, eliminating the manual effort of building and maintaining static test data files.
Ensure test data isolation. Tests should not depend on data created by other tests. Shared test data creates hidden dependencies that cause intermittent failures and make root cause analysis difficult.
Plan for test data refresh cycles. Long running test environments accumulate stale data that diverges from production patterns. Regular data refreshes keep testing realistic and relevant.
Write test cases that are clear, repeatable, and independent. Each test case should describe the precondition, the action, and the expected result. A well written test case can be executed by any team member without additional context.
Apply test design techniques systematically. Equivalence partitioning, boundary value analysis, decision table testing, and state transition testing each expose different categories of defects. Use them in combination for thorough coverage.
Design for both functional verification and business process validation. Individual feature tests confirm that buttons work and fields validate correctly. Business process tests confirm that complete workflows like order to cash, procure to pay, or claims processing execute end to end without data loss or state corruption.
Include negative test scenarios. Verify that the application handles invalid inputs, unauthorized access attempts, missing data, and unexpected user flows gracefully. Systems that only pass happy path testing are systems waiting to fail in production.
Review and update test cases before every release. Requirements change, features evolve, and test cases that were valid last quarter may be outdated today. Stale test cases produce false confidence.
Remove redundant tests that cover the same functionality. Redundant tests increase execution time without increasing coverage. Periodically audit your test suite to identify and eliminate overlap.
Tag and categorize test cases by module, priority, and test type. This enables selective execution during time constrained releases. Running only high priority regression tests against the changed modules is faster than running the entire suite every time.
Execute all test cases mapped to the current release scope. Track execution status in real time using your test management tool (Jira, Xray, TestRail, or Azure Test Plans).
Verify form validations, navigation flows, data persistence, and business logic across all in scope modules. Pay special attention to integration points where data flows between systems.
Run cross browser testing to confirm consistent behavior across supported browsers and devices. Visual inconsistencies and JavaScript errors that appear only in specific browser versions are common sources of production defects.
Execute the full regression suite after every significant code change. Regression testing confirms that new changes have not broken existing functionality. Without it, every release carries the risk of reintroducing previously resolved defects.
Prioritize regression tests by business criticality and change proximity. Tests covering modules adjacent to the code changes are more likely to reveal regression defects than tests covering unrelated functionality.
Automate regression execution within CI/CD pipelines. Manual regression testing is not sustainable at modern release velocities. Teams executing 100,000+ annual regression tests via CI/CD integration report over 90% reduction in effort compared to manual execution.
Test integration points between internal systems, APIs, and third party services. Verify that data flows correctly across boundaries and that error handling works when external services are unavailable or return unexpected responses.
Execute end to end tests that simulate complete user journeys. For enterprise applications, this means testing workflows that span multiple modules and potentially multiple applications. A customer onboarding process might touch CRM, identity verification, document management, and billing systems in sequence.
Validate API responses alongside UI behavior. Unified functional testing that combines API calls with UI validation in a single test journey provides comprehensive verification without maintaining separate API and UI test suites.
Allocate time for structured exploratory testing. Automated tests verify expected behavior. Exploratory testing discovers unexpected behavior, usability issues, and edge cases that formal test cases do not cover.
Use session based test management to focus exploratory efforts. Define charters that target specific areas, time box each session, and document findings systematically. Exploratory testing without structure becomes unfocused and unreproducible.
Validate that the application meets performance requirements under expected and peak load conditions. Measure response times, throughput, and resource utilisation against defined thresholds.
Test for scalability by gradually increasing concurrent users until the system degrades. Identify the breaking point before users find it in production.
Run performance tests in environments that replicate production infrastructure. Performance results from underpowered staging environments are misleading and create false confidence.
Verify authentication and authorisation controls. Confirm that users can only access resources and actions permitted by their role. Test for common vulnerabilities including SQL injection, cross site scripting, and insecure direct object references.
Validate data encryption in transit and at rest. Confirm that sensitive data is not exposed in logs, error messages, or API responses.
For applications in regulated industries, map security tests to compliance requirements (PCI DSS, HIPAA, SOX, GDPR). Security testing is not optional in these environments; it is an audit requirement.
Verify that the application meets WCAG 2.1 AA standards at minimum. Test for keyboard navigation, screen reader compatibility, colour contrast ratios, and alternative text for images.
For public sector and government applications, accessibility compliance (WCAG, Section 508) is legally mandated. Include accessibility validation in every release cycle, not as a periodic audit.
Automated accessibility scanning catches approximately 30% to 40% of issues. Supplement with manual review for layout, flow, and usability concerns that scanners cannot detect.
Compare screenshots of the application against approved baselines to detect unintended visual changes. Visual regression catches layout shifts, font changes, missing elements, and styling breaks that functional tests do not cover.
Snapshot testing is especially valuable after CSS updates, framework upgrades, and responsive design changes where the application functions correctly but looks wrong.
Execute SQL queries to verify backend data integrity after key transactions. Confirm that data written through the UI matches what is stored in the database. Validate data type constraints, referential integrity, and stored procedure outputs.
For enterprise applications where the UI is a thin layer over complex backend logic, database validation is often where the most critical defects hide.
Automate regression tests first. These execute repeatedly, consume the most manual effort, and deliver the highest ROI from automation. Automating a test that runs once provides minimal value. Automating a test that runs every sprint multiplies value with every execution.
Automate business critical paths before edge cases. The order to cash process matters more than a rarely used admin configuration screen. Prioritize automation based on business impact and execution frequency.
Evaluate the automation readiness of your application. Applications with stable, well structured UIs are easier to automate than applications with heavily dynamic, JavaScript rendered interfaces. For dynamic applications, AI native test platforms that use intelligent element identification outperform locator based frameworks.
Choose automation approaches based on team capabilities and application complexity. For teams with strong development skills and simple applications, open source frameworks provide flexibility. For teams that need to scale automation across complex enterprise systems without specialized coding resources, AI native platforms deliver faster time to value.
AI native test automation platforms offer Natural Language Programming that allows any QA practitioner to write tests in plain English. This removes the coding barrier and enables manual testers, business analysts, and domain experts to contribute directly to automation efforts.
Self healing capabilities are essential for enterprise applications with dynamic UIs. Platforms with approximately 95% self healing accuracy eliminate the maintenance burden that consumes 60% or more of automation effort in traditional frameworks.
Implement composable testing architectures. Reusable test components (checkpoints, data configurations, API calls) that can be assembled into complete test journeys reduce duplication and accelerate test creation. Building tests from verified, modular components is faster and more reliable than authoring every journey from scratch.
Schedule regular test suite health reviews. Identify and address flaky tests, slow tests, and disabled tests that accumulate over time. A test suite that is 30% disabled provides 30% less protection than its reported coverage suggests.
Track automation metrics including pass rate, execution time, flake rate, and maintenance hours per sprint. These metrics reveal whether your automation investment is delivering returns or creating a secondary maintenance burden.
Leverage AI Root Cause Analysis for test failures. Rather than manually investigating screenshots, logs, and DOM snapshots for each failure, AI driven analysis identifies the actual cause of failure and distinguishes application defects from test environment issues or test data problems.
Report defects with sufficient detail for developers to reproduce the issue. Include steps to reproduce, expected behavior, actual behavior, environment details, screenshots or recordings, and severity classification.
Classify defects by severity and priority independently. A cosmetic defect on the login page (low severity) might be high priority if the login page is the first thing customers see. A data corruption defect in a rarely used admin function (high severity) might be lower priority for immediate fix but critical for the next release.
Link defects to the test cases and requirements that exposed them. This traceability enables impact analysis and helps stakeholders understand where quality risks exist.
Track defects through a defined lifecycle: new, assigned, in progress, fixed, verified, closed. Defects that stagnate in any state represent unresolved risk.
Retest all resolved defects before closing them. Verify the fix addresses the root cause, not just the symptom. A defect that is closed without proper verification has a high probability of reoccurrence.
Conduct defect trend analysis after each release. Increasing defect counts in specific modules indicate code quality issues that testing alone cannot resolve. Share these insights with development leadership to drive systemic improvements.
Confirm all exit criteria are met. All high and critical defects should be resolved or have documented workarounds with stakeholder approval. Test coverage targets should be achieved. Regression results should be clean.
Execute a final smoke test on the release candidate in a staging environment that mirrors production. This last gate catches configuration issues and deployment errors that are not visible in lower environments.
Verify that deployment rollback procedures are documented and tested. If the release causes production issues, the team must be able to revert quickly.
Monitor production error rates, response times, and user behavior for anomalies in the hours following deployment. Many defects only manifest under real production traffic patterns and data volumes.
Compare production metrics against pre release baselines. A spike in error rates or a drop in conversion rates indicates a potential regression that testing did not catch.
Document lessons learned. What defects escaped to production? What test scenarios were missing? Feed these insights back into test design for the next release. Continuous improvement of the QA process is what separates good teams from great ones.
A QA checklist written six months ago does not reflect today's application, architecture, or risk profile. Review and update the checklist every quarter at minimum.
Attempting to test everything equally means testing nothing thoroughly. When time is limited, the payment flow matters more than the settings page. Prioritise by business impact.
Automation that is not maintained becomes automation that produces false results. Every automated test needs an owner, a review cadence, and a strategy for handling failures. AI native self healing reduces this burden significantly but does not eliminate the need for oversight.
Tests running on stale, unrealistic, or shared data produce unreliable results. Invest in test data generation and isolation strategies as seriously as test case design.
If production defects do not feed back into the checklist, the same gaps persist release after release. Every escaped defect should result in a new checklist item or test scenario.
Every item on this checklist becomes easier to execute when the underlying testing platform is intelligent. AI native platform like Virtuoso QA do not just automate test execution. They automate test creation with StepIQ (analyzing the application to autonomously generate test steps), test maintenance with self healing, test data generation with AI powered data assistants, and failure analysis with AI Root Cause Analysis.
Enterprise organizations using AI native test automation report 10x faster testing delivery, 80% reduction in maintenance effort, and 4X increases in tester capacity.
The QA checklist does not change. The speed and confidence with which your team executes it does.


Try Virtuoso QA in Action
See how Virtuoso QA transforms plain English into fully executable tests within seconds.